Over the summer, a lot of reading, researching, self-reflection and thought lead to the realisation that our diet and cooking needs a bit of a nudge in a healthier, more nutritious direction. In a move to include more plant-based food into my families diet, we've been seeing beans such as these black eyed peas, called lobia in Urdu, making an entry onto our dinner rotation.
The move towards a more plant-based food was a no-brainer for us, as we have always known we have been consuming far too much meat (daily, pretty much!) and little in the form of vegetables and legumes. It dawned on me I wasn't doing myself or my family any favours by not cooking up vegetables on a standard rotation, especially for my 3 year old daughter whose taste-buds, food preferences and likes/dislikes are still developing.

Legumes aside from the regular daals (such as in my Tadka Daal recipe) and chickpeas haven't been cooked much in my household. Me and my husband have always been meat-lovers, therefore even if we ever had daal or chickpeas, it would always be served with chicken or lamb.
This Black Eyed Pea Curry been a rather well received addition, as my husband quite enjoys lobia when the masala is made thick, and my 3 year old daughter has also taken to it, eating it with a spoon instead or roti (I'll take it over nothing!). I'm quite happy too with having this on rotation for the nutritional value (they're loaded with fiber, folate, vitamin A and manganese!) and due to their versatility as being a great pair with both rice and roti, as well as of course having it with a spoon a'la my little daughter 🙂

Dried vs Canned Lobia
In the past, since beans were eaten so infrequently in my household, I'd always opt for canned beans due to the convenience and lack of commitment they required. However, since I've been cooking beans more often, I've gone ahead and purchased 1kg bags of a variety of dried beans which I keep in stock . I can cook in smaller batches without having to worry about a half opened can of lobia in the fridge.
Having had experience of both, I can definitely say cooking from dry really elevates the flavours of the dish, since all the spices have a chance to penetrate into the beans for an extended amount of time as they cook. Using dried beans is also more economical.
Canned beans have a tendency to feel bland despite long cooking times. Having said that, nothing really beats the convenience of just having to crack open a can on a whim, without any advanced planning. This recipe uses dried black eyed peas, but feel free to use canned. Please see the recipe notes to alter the recipe for canned black eyed peas.

Benefits of Soaking
Before using the black eyed peas, I highly recommend soaking your beans for a minimum of an hour. This isn't a health blog, so I won't go into an in-depth explanation as to why soaking is beneficial for beans such as lobia - however I will leave you all this link which is a concise yet super informative article about all the good stuff. In summary, soaking helps break down enzyme inhibitors which would otherwise decrease the nutrient availability. Ideally, we all should soak our beans so we can get the most in terms of nutrition of what we're eating. Black eyed peas don't specifically need to be soaked, but why not soak them if you know you'll be cooking them and know it'll increase the benefits?

Why I used paprika instead of chilli powder
So once you'll go through this recipe, you'll see I've only used paprika and green chili and no red chilli powder. The reason for this is quite simply because I love a fierce red colour in curries that would otherwise look brown/whiteish. Paprika imparts a subtle heat but a good body of colour, whereas since chilli powder can be quite hot you're unable to use a lot - unless you can handle the heat, in which case more power to you! I prefer to keep my level of chilli a bit mild so my daughter can eat with us.
You can achieve the same colour and mild flavour with Kashmiri Chilli Powder too, if you don't have paprika. Alternatively, feel completely free to just use red chilli powder - you can omit the green chillis if you'd like.
Now, on with the recipe!
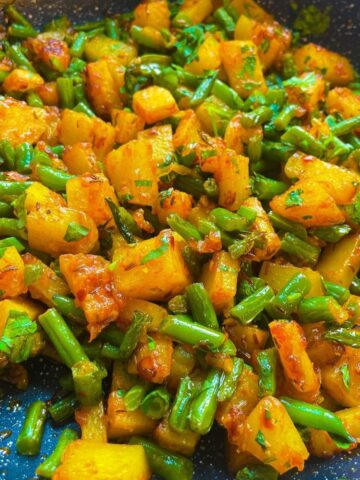
Serve your lobia with either a warm roti or a beautiful plate of steamed plain basmati rice. This stuff is good enough to eat straight with a spoon too, just ask my daughter!
Enjoy, with love x
📋 Recipe

Lobia Masala | Black Eyed Peas Curry
Ingredients
- 1 ¼ cup (200 g) dry black eyed peas
- 2.5 tablespoon (40 g) ghee
- 2 medium (220 g) onions, finely diced
- 2 green chillis cut into 3 pieces each
- 4 garlic cloves, minced
- 1.5 teaspoon cumin seeds
- 2 teaspoon paprika or Kashiri red chilli powder (essential for the colour)
- 0.5 teaspoon turmeric
- salt to taste
- 1 tablespoon tomato puree
- 2 cup water
- chopped coriander for garnish
Instructions
- Soak the black eyed peas for a minimum of an hour, or up to 8 hours. I soaked mine for 6 hours. Drain well before using
- Heat the ghee in a deep pot. Add the onions and cook on medium high, until the onions are transluscent
- Once the onions are transluscent, add the garlic, all the spices and a splash of water. Cover and allow this to simmer on very low heat for about 3-4 minutes
- Uncover and add the tomato puree. Fry this on a medium to high heat well, until the tomato puree has blended into the onion masala
- Add in the black eyed peas. Toast these in the ghee and masala for 5 minutes, stirring often
- Add 2.5 cups of water, bring to a boil, then allow everything to simmer covered on low for 1.5-2hrs, until the beans are tender.
- Adjust for spices and see whether you are happy with the consistency of the gravy. If you prefer a thicker gravy, feel free to dry out some of the water. If you prefer a more watered down gravy, add water half a cup at a time and allow it to simmer for a few moments covered
- Garnish with coriander and serve
Notes
📩 Want me to email this recipe to you?
Enter your email & I'll send it right over.
Plus, you'll get bonus Pakistani food-goodness from Fatima Cooks, like new recipe alerts, exclusive email-only recipes + more!
By submitting this form, you consent to receive emails from me. Your details are secure. Opt-out any time.


Naz
Can you use the same method for red kidney beans aka rajma or lal lobia?
Fatima
I don’t see why not - the only potential problem I can foresee is you may need to adjust the cook time. Go for it!
Sameera Iqbal
Your post says see recipe notes for adjustment for canned pease but o don’t see anything
Can you help? Thanks
AISHA SIDDIQA
I am so glad I discovered your blog today. All of your recipes looks great and I cant wait to try them all. Thank you for these awesome recipes.
Amira
Fantastic!