Chicken Kali Mirch has become a bit of a staple at my house over the last few months since moving to Nottingham. We've begun to gravitate towards boneless chicken since coming here due to a number of reasons.
The most compelling reason is it's pretty easy to repurpose into a sandwich filling, a wrap, a quesadilla all on short notice making it good for on-the-go breakfasts, quick lunches and just generally to make feeding the kids a bit easier. This and my Hariyali Chicken recipe are now permanent fixtures on my weekly dinner menu!

Jump to:
🤔 What to expect from this recipe
What I love most about this recipe is how quickly it comes together and how minimal the ingredients are. All you need is:
- Onions
- Garlic
- Boneless chicken
- Yogurt
- A small selection of spices - salt, black pepper, cumin and coriander powder
- Fresh coriander and green chilli, to garnish (optional!)
The simplicity of the ingredient list also translates into simplicity in flavour too - but not the kind of simplicity that has your taste buds crying for a sprinkling of chilli powder and garam masala.
The predominant flavour in this recipe comes from the black pepper. But, I mean, I didn't really have to say that, did I... because c'mon, the name?! Lol.
In Pakistani cooking, black pepper often plays but a minor supporting role in a long list of spices. It doesn't often stand on it's own in the spotlight. In this Chicken Kali Mirch, the black pepper pretty much holds down the fort in the best way possible - all the other flavours sit back and allow the black pepper to have its big moment. You will love it. The flavours are bold and mature, yet surprisingly mild enough for some children to enjoy too!
How to make Chicken Kali Mirch
Start by taking an onion, diced finely, and adding it into a wok/karahi style dish with some oil in it. It's important that the onions are diced as finely as possible since it helps ensure they 'melt' into the gravy quicker. This dish doesn't take a long time to cook, so larger pieces of onions won't 'melt' in time. Fry the onions until they begin to turn golden.
Add the garlic, chicken and spices. Fry these until the chicken no longer remains pink.


Add in the yogurt (full fat, ideally). Stir and fry the entire mixture for 8-10 minutes until the liquid evaporates, the mixture becomes very concentrated and the oil begins to separate around the edges


Add in half a cup of water, bring to a boil and then cover and cook on low for 20 minutes.


Uncover and allow the chicken to cook uncovered over a medium high heat for a few minutes, until the gravy thickens, looks glossy and again, the oil begins to separate at the edges.
Garnish with fresh coriander and green chillies and serve hot!
🌶️ Is Chicken Kali Mirch spicy?
This isn't a spicy curry per se, but the black pepper does add some heat. It's not as sharp as the spice from red chilli powder.
If you'd like the curry to be spicy, I recommend adding in some green chillies when you add in the yogurt. You can add the green chillies whole, slit or ground into a paste.
A very important thing I'd like to add here is do not use red chilli powder in this recipe. I trialled this recipe once with about ⅓tsp of red chilli powder and my goodness, the way the yogurt took on the red colour of the chilli powder - it looked like a boneless chicken karahi! It was such a deep shade of red which looked very beautiful mind you, but it wasn't the sort of colour you typically get for a Kali Mirch dish. If you want more heat, add more black pepper or green chillies.

🍗 Best cuts of chicken to use
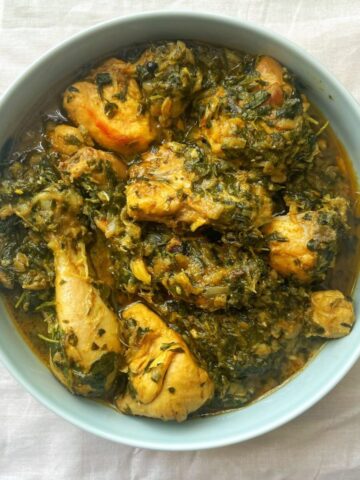
My personal preference is boneless chicken thigh - it's just so juicy, tender and flavoursome! In the pictures you're seeing in the post, I've used chicken breast and it works fine too, it's just less juicy and more firm than thigh.
You can actually also use ground/minced chicken (keema) too - thigh or a combination of breast and thigh is my recommendation for keema.
You can also use bone-in chicken too - you can use 500g bone-in chicken in place of the 500g boneless chicken stated in this recipe
Other recipes you may enjoy
Chicken Korma | Chicken Jalfrezi | Malai Chicken Karahi | Chicken Dopiaza | Hariyali Chicken
🥣 How to avoid yogurt curdling
This is such a common problem - I've been there and I have literally wept over curdled yogurt. The two best strategies I personally have found effective in avoiding this is:
- Beat the yogurt VIGOROUSLY before adding it in to the pan. And I mean VIGOROUSLY.
- This tip only works if you have plenty of free time - take the pan off the heat, allow it to cool down and once it's just warm (not hot), add in the yogurt and then bring the pan back onto the heat and slowly bring the heat up. This is pretty time consuming though and I prefer the first option
🍽️ How do I serve Chicken Kali Mirch?
My favourite way to serve it is with naan or roti. I also love love love to have it in a sandwich, wrap, paratha roll - it's very non-desi in flavour so it also works pretty decently in salads and pasta too - not that there's anything wrong with a desi flavoured pasta AT ALL 😏.
📋 Recipe

Chicken Kali Mirch
Ingredients
- 4 tablespoon (60 ml) oil
- 1.5 (165 g) medium onion diced finely
- 1 heaped tsp garlic paste
- 1.1 lb (½ kg) boneless chicken
- 3-4 teaspoon coarsely ground black pepper add 3 initially then add the 4th teaspoon towards the end if you feel like you want a stronger flavour
- 1 teaspoon salt
- 0.5 teaspoon cumin powder
- 0.5 coriander powder
- 0.6 cups (150 g) full fat yogurt
- Fresh coriander and green chilli for serving
Instructions
- Heat the oil in a wok/karahi style pan. Add the finely diced onions and fry over a medium to high heat until the onions begin to turn golden.
- Add the garlic, chicken and spices. Fry everything until the chicken no longer remains pink.
- Add the yogurt. Stir everything together and continue to sauté the mixture until the yogurt concentrated into a thick, jammy paste, looks glossy and the oil begins to separate around the edges.
- Add half a cup of water, bring to a boil and then cover and cook on low for 20 minutes.
- Once the time is up, uncover the curry and then cook over a medium to high heat for 5 minutes, until the curry begins to look glossy and the oil separates around the edges. You can dry it out till it is your desires consistency or alternatively keep the gravy a little thinner.
- Serve garnished with fresh coriander and green chillies.
📩 Want me to email this recipe to you?
Enter your email & I'll send it right over.
Plus, you'll get bonus Pakistani food-goodness from Fatima Cooks, like new recipe alerts, exclusive email-only recipes + more!
By submitting this form, you consent to receive emails from me. Your details are secure. Opt-out any time.


Ayesha
I've just eaten this dish and really enjoyed it. It was spicy without being too hot.
I made the 3 larger portion version and I added 3 finger chillies sliced thinly into the mix for the last 3 mins and served it with basmati rice.
This is an easy recipe to make and one I'll be keeping handy for future use.
Mina
Hi, I made your recipe and I really loved the explanation of the first step, with the small onions and letting them cook down before proceeding. Previously my onions and tomatoes would swim in the sauce and I hated it. Now the dish had a wonderful aroma and texture
Paul.haigh
A spicey quick dish which I,ll make again.
Zoha Afzal
Hello, trying out one of your recipes for the first time and this sounds really nice 🙂 Can I make this with bone-in karhai cut chicken?
Kim
Fatima, we lovedddddd this recipe! It was so flavorful, and your instructions were perfect. I am super looking forward to trying all of your other dishes <3
Fatima Cooks
So so happy to hear! Hope you continue to enjoy my recipes <3
Anastasia
Just made this so tasty, only put 3 small teaspoons of black pepper, one green chilli to give it a little heat.
Definitely worth not speeding up any of the stages, as it came out a really rich brown colour.
Yummy and I have some left for tomorrow.
Thank you
Fatima Cooks
Thank you so much for your kind words, I'm so glad you tried it! And I totally agree, the time you invest with the onions will reward you back! 😁
Bob S
Simple and perfectly delicious, so different from other desi dishes I've done. Just what I was looking for, thanks!
Fatima Cooks
You're very welcome - glad you enjoyed it!
Bob S
Simple and perfectly delicious, so different from other desi dishes I've done. Just what I was looking for, thanks!
Faye
Beautiful was looking for a healthier easy option from my normal mirch chicken takeaway. So simple and easy to make. Mine was more light brown. Will try add something else to darken the colour next time.
Fatima Cooks
Thank you so much! Glad you enjoyed it, Faye!
Ekaterina Petri
Followed the recipe to the T, the sauce did not thicken at all, was liquid and runny
Fatima Cooks
I'm sorry to hear that! Sometimes there can be more liquid than expected, possibly from the chicken, yogurt or onions if they're particularly watery. Sometimes there's a different in water content between products depending on where in the world you are.
If it looks runny after following this recipe times, definitely continue to cook the sauce down until it looks right. Hope you were able to enjoy the curry despite the sauce 🙌🏼
Phil
Is ir ok to use Greek yoghurt 10% ?
Sara
This came out so beautifully balance and delicious. Incredibly simple to follow, no fancy ingredients everything already in the kitchen cupboards - yet such a different distinct flavour - thank you!
Agata
Hello,
Can I serve it with rice ?
Fatima
If you want to, yes! 🙂
Dianne Lam
Thank you SO much for your recipes! They look absolutely amazing. I have been looking at online recipes for years & this is THE best I have seen so far. Once more, THANK YOU!
Fatima
So happy to hear that, Dianne! Thank you so much
Glenn B
Hi Fatima
If I am trebling the meat to 1.5kg should I treble the amount of spice etc that I use. Thanks. Glenn
Fatima
Hi Glen - yes, trebling everything is a good move!
Jussi
How did you all made red colour ? My meat and sauce came proper white
Fatima
I don't think mine looks red, I feel like it's more of a brown. Either way, I'd put it down to using red onions and really darkening the onions when frying. Hope that helps x
Sameera Iqbal
I loved this recipe, like all of your recipes. You have a way of bringing out the nuances in desi cooking and while it may seem like every curry is the same ingredients I follow your recipe to a T and every single one is unique and delicious! Thank you
Anum
Oh. My. Lord! This was so good!
Followed the recipe exactly and used chicken breast- Definitely going to be making it again😄
Fatima
Thank you so much, Anum! I'm so happy you enjoyed the recipe! <3
Toby
Do you think this would work with ground beef?
Fatima
I haven't ever done it myself but I don't see why it wouldn't work!
Toby
@Fatima, Thank you! I will print out the recipe.